
Disilab
- Social Questions and Answers HTML Template
By: TechyDevsEmail: contact@techydevs.com
Thank you for purchasing Disilab- Social Questions and Answers HTML Template If you have any questions that are beyond the scope of this help file, please feel free to email, via my user page contact form or put a ticket at Support Center. Thank you so much!
We continue to add new things to make our template more beautiful and strong every day. You will be free to use all our updates.
Template Features
- 3 Home Pages
- 44+ inner pages
- Question details page
- Flexible user setting page
- Beautiful user detail page
- RTL Fully Supported
- Upvote or Downvote question and answer
- Clean & Modern Design
- Bootstrap 5
- Owl-carousel Slider
- SASS (SCSS)
- HTML Validate
- CSS3 Validate
- Beautiful Popup modal for login, sign-up and recover password
- Fully Responsive Design
- All files are well commented
- Crossbrowser Compatible with IE10+, Firefox, Safari, Opera, Chrome
- Extensive Documentation
- And more.

Gulp Start
Follow the steps below:
- Download the latest template source from ThemeForest.
- Extract Disilab downloaded zip file. Extracted zip file will have 2 folders.
- Disilab => main source files
- Documentation => guide lines
- We'll start of the process by installing Gulp onto your computer. Gulp requires you to have Node.js and Node Package Manager (NPM) installed on your system, so if you haven’t gotten them yet,
then go to Node.js’swebsite and download the installer. - Once you’re done installing Node.js and NPM, you can install Gulp by typing the following command in the command line:
- Start with command prompt if you use windows or start with terminal if you use mac:
- sudo npm install gulp-cli -g
- # Note: Windows users do not require the `sudo` keyword
- cd / your Disilab folder directory
- npm install gulp --save-dev
- # Note: don't use sudo keyword mac users and windows users now
- Now your gulp will be installed after run this command [npm install gulp --save-dev]
- Now go to your main file joby file. and You will also see a new folder > node_modules
that was created when you ran the npm install gulp --save-dev command.
SASS install
- sudo npm install -g sass
- # Note: Windows users do not require the `sudo` keyword
-
// go to the project root in the terminal using the CD command.
// in the root of your project directory run the following commands.
-
A. To compile sass use the following command
[gulp style]
B. To watch for changes in SASS file and to compile automatically use the following
command > [gulp watch], and to stop watching files,
use CTRL + C on Windows or Command + C on Mac OS
- More clarification how to install sass and use go to sass's website
- If you have any confusion then feel free to contact us
Installation
Follow the steps below to setup your site template:
FTP Upload:
- Unzip the downloaded package and open the Disilab/main-file folder to find all the template files. You will need to upload these files to your hosting web server using FTP in order to use it on your own website.
- You need to upload all files inside the Disilab/main-file folder to your website root.
- Disilab/css css files
- Disilab/fonts Icon, fonts files
- Disilab/images images files
- Disilab/js Javascript files
- Disilab/php PHP files
- Disilab/sass scss files
- You are now good... Start adding your content/images generate your beautiful brand new website for your awesome users.
HTML Structure
The html template uses Bootstrap v4 with valid HTML5 tags. This template is a responsive layout with 4 column Support column. All of the information in content area is nested within a class and comes with predefined classes.
HTML Structure
Now, here's a look at a typical HTML file:
<!DOCTYPE html>
<html>
  <head>
    <title>Template</title>
    <meta name="viewport" content="width=device-width, initial-scale=1.0">
  </head>
  <body>
    <section>
        <h1>Hello, world!</h1>
        <p>I am a paragraph</p>
    </section>
    <script src="js/jquery.js"></script>
  </body>
</html>
To make this a Bootstrapped template, just include the appropriate CSS and JS files:
<!DOCTYPE html>
<html>
  <head>
    <title>Template</title>
    <meta name="viewport" content="width=device-width, initial-scale=1.0">
    <!-- Bootstrap -->
    <link href="css/bootstrap.min.css" rel="stylesheet" media="screen">
  </head>
  <body>
    <section>
      <div class="container">
          <div class="row">
            <div class="col-lg-8">
                <h1>Hello, world!</h1>
                <p>I am a paragraph</p>
            </div>
            <div class="col-lg-4">
                <h1>Hello, world!</h1>
                <p>I am a paragraph</p>
            </div>
          </div>
       </div>
    </section>
    <script src="https:js/jquery.js"></script>
    <script src="js/bootstrap.min.js"></script>
  </body>
</html>
And you're set! With those two files added, you can begin to develop any site or application with Bootstrap.
Basic Grid HTML
For a simple two column layout, create a .container and add the appropriate number of .col-lg* columns.
Given this example, we have .col-lg-4 and .col-lg-8, making for 12 total columns and a complete row.
......
Nesting Columns
To nest your content with the default grid, add a new .container and set of .col-lg* columns within an existing .col-lg* column. Nested rows should include a set of columns that add up to the number of columns of its parent.
Level 1 columnLevel 2Level 2Level 2 column
CSS Files Structure
There are two main files are in this template. The first one bootstrap.min.css, second one is style.css which for this template
If you would like to edit a specific section of the site, then go to sass folder and open specific scss file, and then scroll down until you find the appropriate style that needs to be edited.
Note: If you don't know SASS then you can edit style.css file
This is an example of how to include CSS files into the templates on top of the document.
<link href="css/main.css" rel="stylesheet">
Font
Disilab template used 1 font from google fonts library or you can change the font from google fonts library
This is an example of how to include font link into the templates on top of the document.
<link href="https://fonts.googleapis.com/css2?family=Ubuntu:wght@300;400;500;700&display=swap" rel="stylesheet">
General setting
To change the logo, title, favicon image of your site. you go to top of the documentation
Title

Favicon

Logo

Leaflet Map
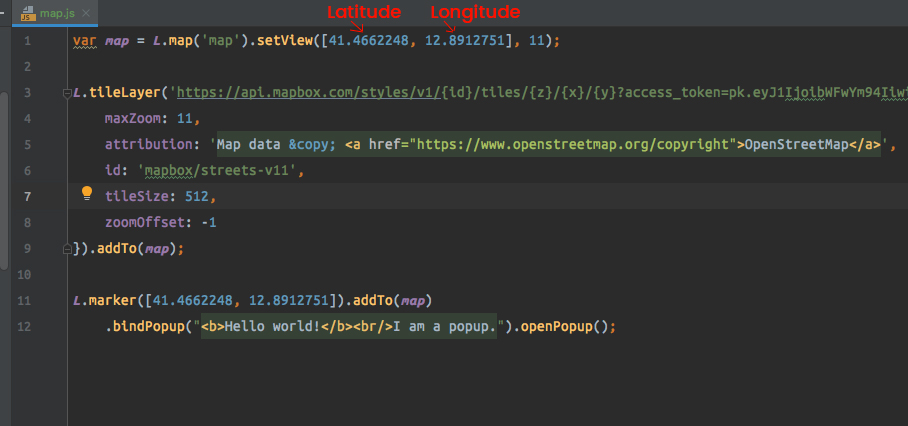
To change the map address go to js folder then you will see a js file named in map.js
Ajax Contact form
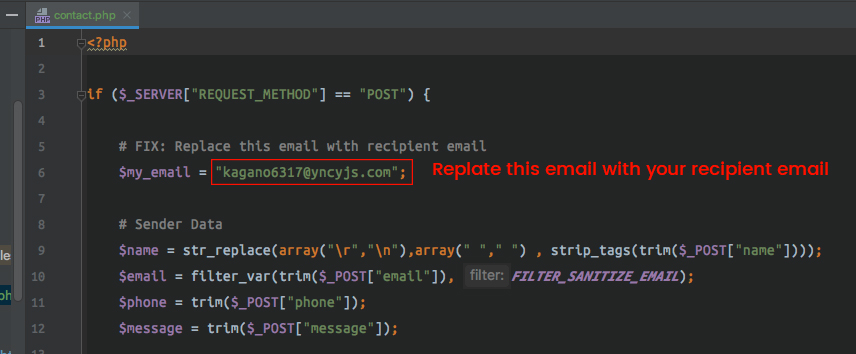
To change the email address go to => php folder then you will see a php file named in contact.php
Javascript
This template imports three types of Javascript files.
- jQuery
- Custom scripts (main.js)
- Some plugins
- jQuery is a Javascript library that greatly reduces the amount of code that you must write.
- Most of the animation in this site is carried out from the customs scripts. There are a few functions worth looking over.
In addition to the custom scripts, I have implemented few "tried and true" plugins to create the effects. This plugin is packed, so you won't need to manually edit anything in the file. The only necessary thing to know is how to call the method
This is an example of how to include the js file into templates at end of the Body Section.
<script src="js/main.js"></script>
Tutorial
Setting (RTL) right-to-left page
Base direction
Before we start, we need to introduce an important concept.
In order for text to look right when an HTML page is displayed, we need to establish the directional context of that text.
In HTML the base direction is either set explicitly by the nearest parent element that uses the dir attribute, or, in the absence of such an attribute, the base direction is inherited from the default direction of the document, which is left-to-right (LTR).
Setting up a right-to-left page
Add dir="rtl" to the html tag any time the overall document direction is right-to-left. This sets the base direction for the whole document.
Note: No dir attribute is needed for documents that have a base direction of left-to-right, since this is the default.
<!DOCTYPE html>
<htmldir="rtl"lang="ar">
<head>
<meta charset="utf-8">
...
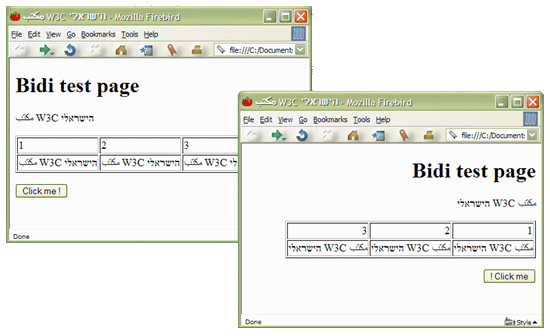
Adding dir="rtl" to the html element will cause block elements and table columns to start on the right and flow from right to left. All block elements in the document will inherit this setting unless the direction is explicitly overridden.
Language tags.
While you are declaring the directionality of the document in the html tag, don't forget to declare the language of the document using the lang="ar" attributes
The illustration below shows what content looks like before (left) and after (right) the dir attribute is added to the html tag.
Quick start
Add bootstrap-rtl.min.css to your document's top and remove main.js file and add main-rtl.js to your document's bottom that page you want to RTL right-to-left page
You are now good... your page will be RTL right to left
Support
Once again, thank you so much for purchasing this template.
We are happy that you are one of our customers. If you come up with any template related questions
that are beyond the scope of this help file, please feel free to
contact us
We will respond as soon as possible, usually faster. We are open from 10am to 7pm (GMT), from Saturday till Sunday.
Email Us at: contact@techydevs.com
Visit website Techydevs.com